
Made from red, green and blue lights. It's referred to as an additive colour process. RGB is the default colour mode of Photoshop. An image from a digital camera or scanner will be RGB. RGB has a broader spectrum of colours available for use on screen as appose to CMYK for print. The range is called the 'colour gamut' and the RGB gamut is greater than CMYK.
To change the image mode you go to 'Image>Mode'. When you convert the image from RGB to CMYK, the brightness of the colour may be altered if it isn't in the CMYK gamut to the nearest colours available.

RGB Teal

CMYK Equivalent
Gamut Warning


To alter this, I can go to Hue & Saturation. As you can see by altering the Saturation down slightly, I've brought the colours back into the CMYK gamut without having to convert my image to CMYK and having no control over the image colours whatsoever.

I can use an adjustment layer to bring some of those colours back up to their original colour brightness while sticking in the CMYK colour gamut.


When I select 'Proof Colours' the image seems to look duller, not as bright or vivid. It's a similar change that you would get from changing the the RGB colour mode to CMYK. By doing this, the image remains in RGB, which is Photoshops default mode but you can see how it will look in CMYK. You can tell this by looking at the tab at the top of the image. This now says RGB/8/CMYK.
Before you move and image into Indesign or Illustrator, you must convert the image to CMYK. RGB files are smaller than CMYK which could be a consideration and reason for working with that in Photoshop.
Swatches

Swatches and colour palette works in the same way as illustrator.
By holding 'ALT' and clicking on the swatches, this will delete them all giving you can empty swatch palette. By changing the foreground and background colour to default, the shortcut is 'D' on the keyboard, or you can click the little icon underneath the two colours on the toolbar.

To save the blank swatch to use on other pieces of work, you can go to the drop down menu in the swatches option bar and click save swatch as, then save it where you wish. This could be in the folder of a certain project or in the default swatches photoshop folder.

We can now add out own colours to the swatch and to activate the colour picker you can click on the foreground colour. You can also alter the CMYK percentages along with RGB, HSB and LAB. As you can see by the image, a triangle sign with an exclamation mark appears when the colour you have chose is outside the printing gamut. To alter this you can simply move until it disappears or click the cube to automatically go to the next nearest colour.

The square with the cube above it indicate whether the colour is available for web based design which has similar considerations to the CMYK colour gamut. This indicates that this particular colour isn't 'WEB SAFE'.
You can then add the swatch to your palette by again moving to the swatch palette and filling it in with the foreground colour you have chosen.

I can use the colour sliders to select and alter my colours and percentages then add the colour to the swatch palette in the same way.
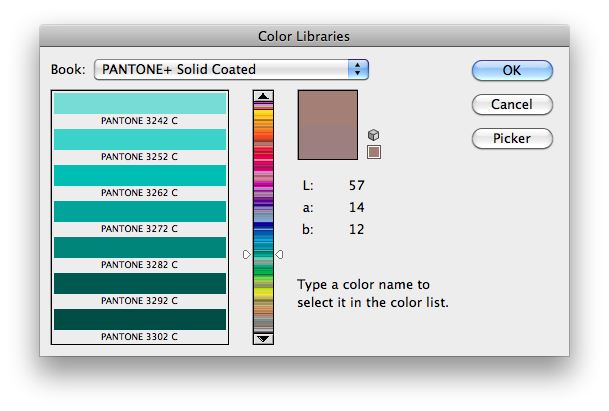
To access the colour libraries click on the foreground colour to get the colour picker up and then click on 'colour libraries' to bring up this box. You can scroll down the colour bar to find what your looking for or type in the PANTONE code to select a specific referenced spot colour.
Duotone
A Duotone is greyscale image with a a spot colour overprinted which accents the grey scales within the greyscale image. This only works with greyscale images.
Image>Mode>Duotone

Original B/W Image

By clicking into duotone and working under monotone, I can change the image so it uses one colour and tints of that colour.

This is using two colours - Duotone to create the image by using the two spot colours and tints of them colours.

Altering the curves on the monotone.
Channels
Channels are split up into colours. For a CMYK image, you have four channels; Cyan, Magenta, Yellow and Key and for a Greyscale image there is one channel; Grey. It is similar
It is almost like a puzzle revealing itself before our eyes.


I can make a selection using the various tools and so I don't lose the selection and all the work i have put in, I can create an alpha channel in the channel palette at the bottom when the selection is selected. This makes a new channel called the 'Alpha Channel' which keeps the selection available for future use. As you can see from the image the boar has been created as an aplha channel. You can modify this selection by painting onto it at a later date.


When I click on 'New Spot Channlel' this box comes up and I can change the spot colour by choosing it from my spot colour reference. The name remains the same as a unique PANTONE reference number which is reassuring. This creates a layer which we can apply a spot colour over the top of the image as a separate channel.

When we send this off for print, we can ask them to use a certain PANTONE to be applied as a varnish or glue instead of a colour and this is useful for that. It's also useful for screen printing when creating positives. It enables us to work with overlaying inks, printing one ink on top of another. From this we can easily get to a positive for each of the inks we are applying to.
Like the duotone, the spot colour remains editable, so we can change this at a later date.


This is the only way you can create a spot varnish for an image you are working with.

To save you can save as a .TIF or a .PSD file but the important thing is that the spot colours is ticked or else it will not save the channel.
Spot Colours are only accurately produced commercially and will not be exact when printed on a laser or inkjet printer.

Leave your comment